Status Bars API

The Status Bars component is a flexible system for displaying vital statistics like Health, Armor, Hunger, Thirst, and Stamina. Unlike other components, this is a Multi-View System. You can create multiple independent groups of bars (Views) positioned at different parts of the screen.
⚙️ Internal Architecture
The View System
To use this component, you must understand the hierarchy:
- The Component: The global manager.
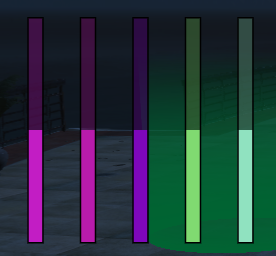
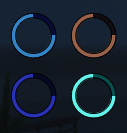
- The View: A container/grid located at specific coordinates. It defines the layout (Horizontal, Vertical, or Radial/Circular).
- The Bar: An individual indicator (Health, Hunger, etc.) inside a View.
Grid Layouts
When creating a View, you define columns and rows.
- If you want a vertical stack, use
cols=1, rows=5. - If you want a horizontal strip, use
cols=5, rows=1. - The
colsSpacingandrowSpacingparameters control the padding between bars in the grid.
Accessing the API
local Status = exports['eir_hud']:GetEirAPI().StatusBars
-- or
local Status = exports['eir_hud']:GetStatusBarsAPI()
1. Managing Views (Containers)
Before adding bars, you must create a View.
CreateViewScreenCoords(x, y, type, cols, rows, colSpac, rowSpac)
Creates a new container using normalized (0.0-1.0) screen coordinates.
Parameters:
x,y: Position (0.0 - 1.0).type: Layout Type.0: Horizontal / Linear.1: Vertical / Stacked.2: Radial / Circular.
cols,rows: Grid dimensions (e.g., 1, 4).colSpac,rowSpac: Spacing in pixels.
Returns: integer ViewID (Save this!).
-- Create a vertical stack of up to 4 bars in bottom left
local myViewId = Status.CreateViewScreenCoords(0.01, 0.95, 1, 1, 4, 0, 5)
CreateViewScreenPixels(x, y, type, cols, rows, colSpac, rowSpac)
Same as above, but uses exact pixel coordinates (based on current resolution reference).
UpdateViewScreenCoords(id, x, y, type, cols, rows, colSpac, rowSpac) / UpdateViewScreenPixels(id, x, y, type, cols, rows, colSpac, rowSpac)
Moves or reconfigures an existing view. Requires ViewID.
ClearView(viewId)
Removes all bars from a specific view.
2. Adding Indicators
Once you have a ViewID, you can add bars to it. Returns: integer BarIndex (Save this to update the bar later!).
AddBar(viewId, width, height, color, percent, iconPos, txd, txn)
Adds a linear (rectangular) bar.
width,height: Dimensions in pixels.color: SColor integer.percent: Initial value (0-100).iconPos: Icon position logic (0=Left, 1=Top/Above).txd,txn: Texture Dictionary/Name for the icon (e.g., “hud_textures”, “heart”).
-- Add Health Bar
local healthId = Status.AddBar(myViewId, 200, 16, SColor.HUD_Green, 100, 0, "hud_txd", "heart")
AddCircleBar(viewId, radius, startAng, endAng, percent, txd, txn, color)
Adds a radial (circular) indicator. Only works if View Type is 2.
radius: Size of the circle.startAng,endAng: Arc degrees (e.g., 0 to 360 for full circle).
RefreshView(viewId)
Use this to refresh a view or making sure every bar is positioned correctly in the grid.
3. Updating Values
Use these functions in your main loop or event handlers to update the player’s status.
UpdateBar(viewId, barIndex, color, percent)
Updates a linear bar.
-- Update Health to 50%
Status.UpdateBar(myViewId, healthId, SColor.HUD_Green, 50.0)
UpdateCircleBar(viewId, barIndex, color, percent)
Updates a radial bar.
4. Visibility & Global Settings
ShowComponent() / HideComponent() / ToggleComponent()
Controls visibility of all views simultaneously.
SetComponentPosition / SetComponentSize
Note: Generally not used for this component, as positions are handled per-view.
Data Retrieval
GetViewBounds(viewId)
Returns the calculated screen boundaries for a specific View, containing all its bars.
- Returns:
BaseComponentData
GetValuesRuntime()
Returns the table containing all views and their current configurations.